
Effectively setting up and managing email aliases, forwarders, and autoresponders in cPanel is a straightforward process that can significantly streamline your email communications. This is particularly beneficial for individuals or businesses managing multiple email addresses or domains. This detailed guide will walk you through the essential steps for configuring and utilizing these powerful email management features within cPanel, covering their creation, removal, and useful supplementary functions like autoresponders and domain-wide forwarding. Mastering these tools will help you maintain an organized inbox and ensure no important messages are missed.
An email forwarder is a core feature within cPanel that enables the automatic redirection of incoming emails from one specified email address to another. When an email is sent to the original address, it is instantly and seamlessly rerouted to the designated forwarder address, ensuring immediate delivery to the intended recipient.
Email forwarders are an invaluable tool for individuals and organizations that need to consolidate communication from various email accounts. For instance, if you operate distinct email addresses for sales inquiries, customer support, and personal correspondence, configuring forwarders allows all emails destined for these diverse accounts to converge into a single, unified mailbox. This consolidation dramatically simplifies email administration, empowering you to monitor one central account rather than juggling several, ultimately enhancing productivity and responsiveness.
An email alias serves a similar purpose to a forwarder but offers an additional key capability: it allows you not only to receive emails at the alias address but also to send emails from it. Essentially, an alias acts as an alternative email address that shares the same inbox, sent items, drafts, and trash folders as your primary email account. This means you can present a professional, branded email address without the overhead of maintaining a separate, full-fledged mailbox.
Aliases are exceptionally well-suited for businesses looking to employ multiple email addresses for different functional roles (e.g., info@yourdomain.com, contact@yourdomain.com) without the necessity of creating and managing individual email accounts for each. This approach not only streamlines overall email management but also ensures a consistent and professional communication front, simplifying how your customers interact with your brand.
Creating an email forwarder or alias is a robust feature designed to automatically redirect emails from one address to another. This functionality proves particularly advantageous in various scenarios, such as ensuring multiple team members receive customer inquiries, or when you need to manage several email addresses without the need to constantly check multiple inboxes. This section will guide you through the process of setting up an email forwarder or alias using your cPanel interface.
It's important to understand that an email forwarder or alias does not store emails; instead, it efficiently redirects incoming messages to another designated email address. This makes it a highly effective tool for email management, preventing unnecessary clutter in various inboxes.
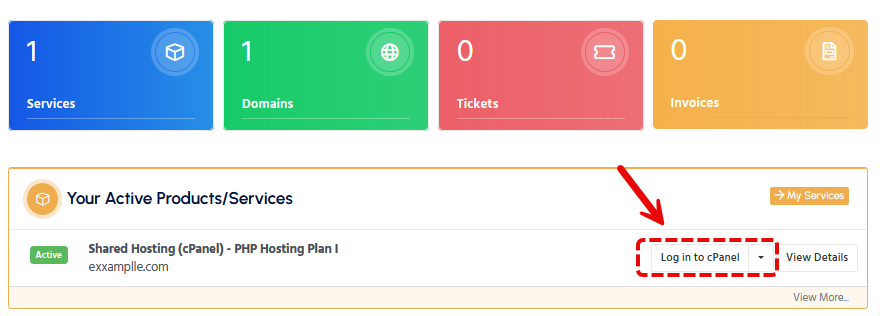
To begin, you need to log into your cPanel account. You can typically access cPanel directly through your hosting provider's client area or via a direct URL provided by your host. Navigate to the services or hosting section within your client area and locate the cPanel login link for the relevant hosting account.
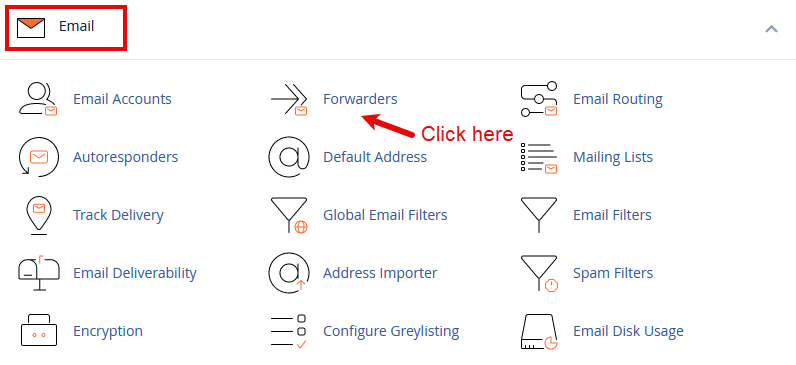
Once you have successfully logged into your cPanel, scroll down to the "Email" section. Within this section, click on the "Forwarders" option. This action will direct you to the dedicated page where you can effectively manage and oversee all your existing email forwarders and aliases.
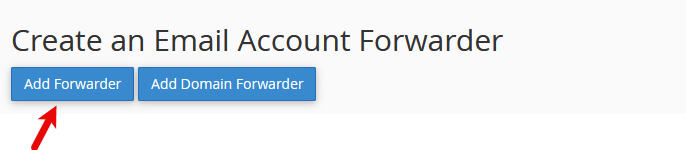
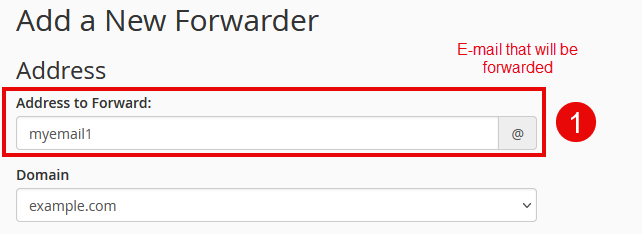
On the Forwarders page, locate and click the "Add Forwarder" button. You will then be prompted to input the email address you wish to forward from. For example, if your goal is to forward all emails sent to info@yourdomain.com, you would simply enter "info" into the first text box and then select your specific domain from the accompanying dropdown menu. This ensures that the system correctly identifies the source address for the redirection.
Important Note: It is crucial to ensure that the email address you are setting up a forwarder for does not already exist as a standalone mailbox, unless your specific intention is for emails to be simultaneously received by that mailbox and also redirected to another address. Creating a forwarder for an existing mailbox can lead to confusion if not managed carefully.
In the "Destination" field, you will clearly specify the email address where you want all incoming messages to be forwarded. This can be any valid email address of your choosing, including those outside of your current domain, such as a personal Gmail, Outlook, or other webmail account. This flexibility allows for complete control over where your emails are delivered.
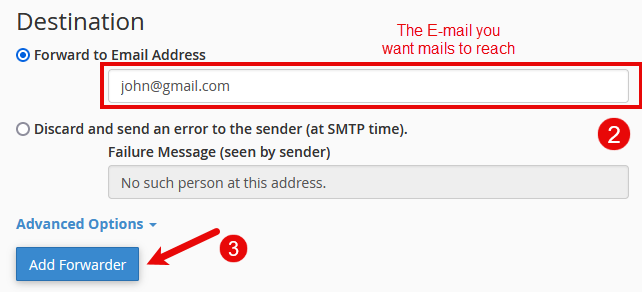
After accurately entering the desired forwarding address, proceed by clicking on "Add Forwarder" to finalize the setup process. Upon successful completion, the newly configured forwarder should immediately appear in the list on the "Forwarders" page, confirming its active status and readiness to redirect emails.
Congratulations! You have successfully established an email forwarder or alias. Emails addressed to the original address will now be automatically and seamlessly redirected to the forwarding address you precisely specified, ensuring efficient message delivery.
Once created, you will be able to review the detailed information of your new forwarder, which includes its name, the target email address, and available options to trace or delete the forwarder as needed, providing comprehensive management capabilities.
While email forwarders and aliases are incredibly powerful tools for streamlining communication, their use requires careful consideration and judicious management. Over-reliance or improper configuration can inadvertently lead to confusion, or worse, cause important communications to be missed entirely. Furthermore, it is essential to ensure that any forwarded emails do not accidentally breach privacy policies or violate anti-spam regulations, which could have serious implications.
Should an email alias no longer be required, follow these straightforward steps to efficiently remove it from your cPanel account, ensuring your email setup remains tidy and optimized:

Crucial Warning: Once an email alias has been deleted, any future emails sent to that address will no longer be forwarded or delivered. It is imperative to confirm that you no longer require the alias for any communication purposes before proceeding with its permanent deletion.
After successfully deleting an email alias, it is considered best practice to verify that your overall email setup continues to function as intended. If the deleted alias was responsible for redirecting important emails, make certain to update any relevant records or promptly notify all affected parties about the change in communication channels.
Success! You have now effectively removed an unnecessary email alias, contributing to a more streamlined and efficient management of your email communications.
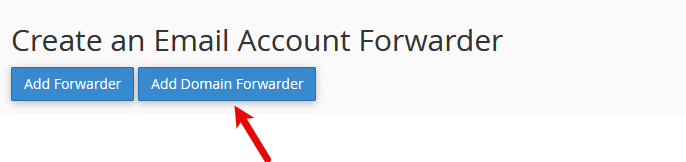
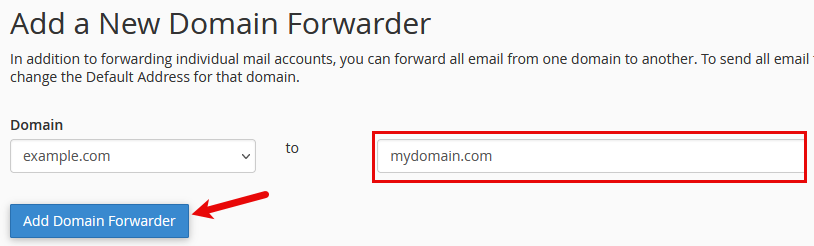
For users or administrators managing multiple domains, cPanel offers a highly convenient feature that allows you to forward all emails from an entire domain to another. This functionality is perfectly suited for consolidating emails originating from various domain names into a single, centralized inbox, greatly simplifying email oversight.
To set up comprehensive domain forwarding, follow these steps:
An autoresponder is an automated email message system that sends a pre-defined reply in response to incoming emails. This feature is exceptionally useful for a variety of scenarios, such as immediately notifying senders when you are away from the office, on vacation, or simply to confirm that their message has been successfully received and will be addressed in due course. Autoresponders provide instant feedback to senders, managing expectations and enhancing professionalism.
Follow these steps to effectively configure autoresponders for your email aliases within cPanel, ensuring automated responses are sent for designated addresses:
Crucial Warning: It is critically important to ensure that the email alias you are configuring does not forward emails back to the very same account from which it is set to autorespond. Such a configuration can inadvertently create an email loop, leading to significant issues with email delivery and potential mail server overload. Always verify your forwarding paths to prevent this.
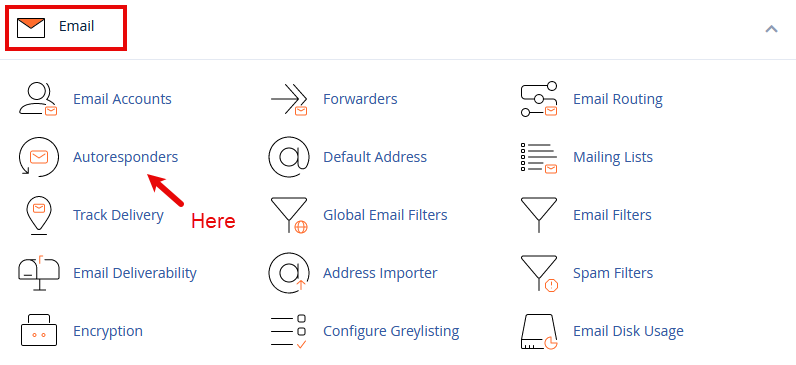
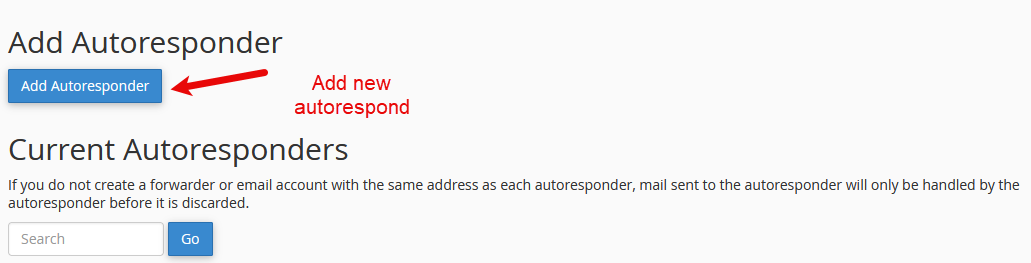
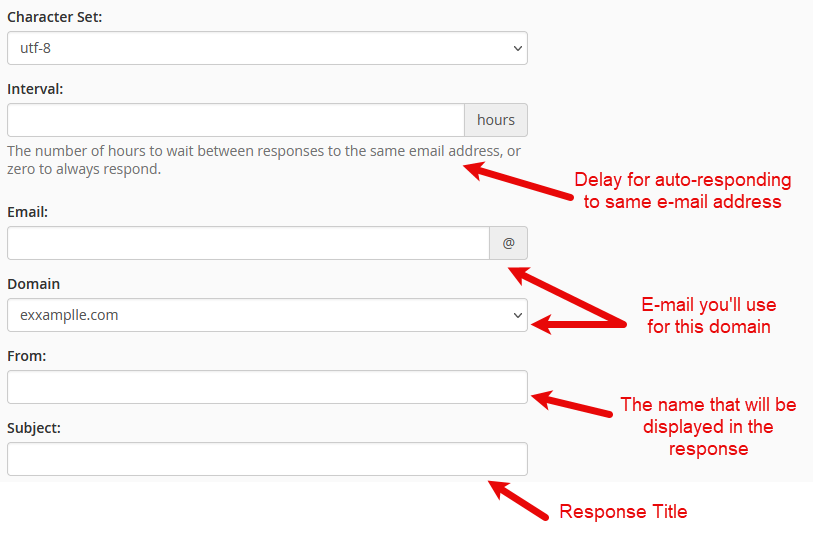
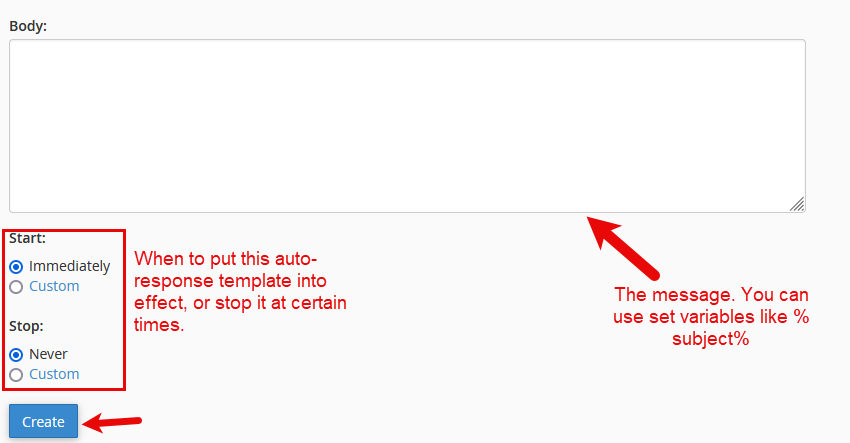
Success! You have now successfully configured an autoresponder for your email alias. From this point forward, any emails sent to your designated alias will automatically trigger the customized response you have set up, providing immediate communication to your senders.
Occasionally, issues may arise with email delivery or forwarding. cPanel offers an invaluable "Email Trace" tool designed to help you diagnose and resolve these issues by providing highly detailed information about an email's journey from its sender to its final recipient.
cPanel's Email Trace tool is an essential diagnostic utility that allows you to meticulously check the status of email forwarders and efficiently troubleshoot any delivery problems that might occur. This tool provides granular insights into the email flow.
To effectively utilize the Email Trace tool in cPanel:
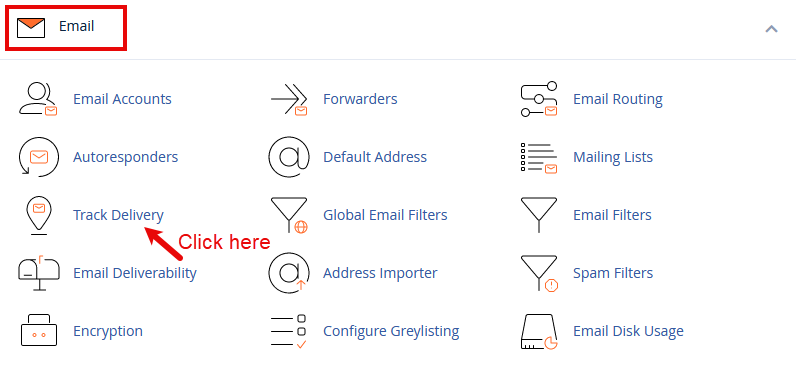
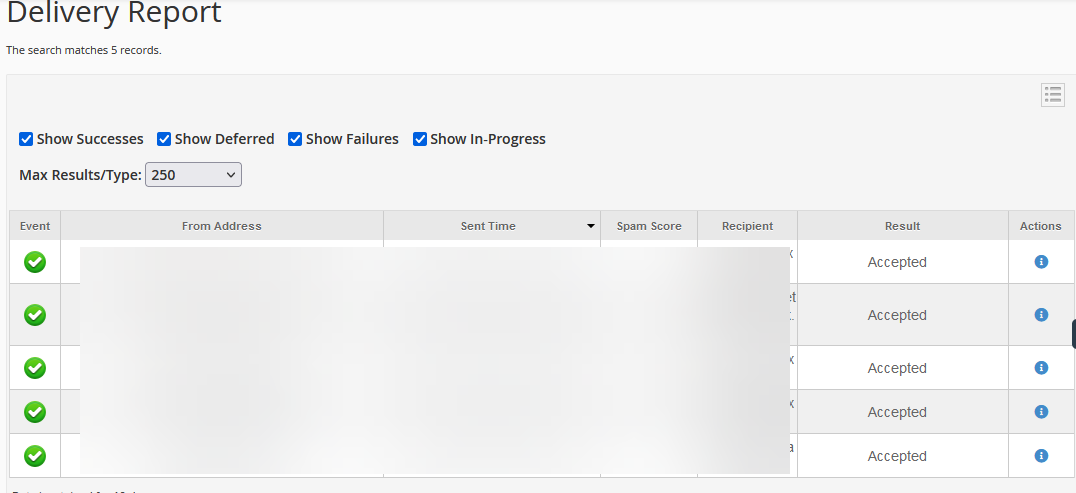
Success! This diagnostic tool is particularly effective for verifying that forwarders are operating precisely as intended. You can easily confirm if emails are being successfully redirected to their specified destination addresses without hindrance.
When you use the Email Trace tool, you will be presented with comprehensive logs that include vital information such as:
This granular information is incredibly valuable for accurately troubleshooting any forwarding issues. For instance, if an email directed to a forwarded address is marked as "failed," these logs provide the necessary details to investigate further and efficiently resolve the underlying problem, ensuring seamless email flow.
Critical Alert: Pay very close attention to any messages within the logs that are explicitly marked as "deferred" or "failed." These statuses are strong indicators of underlying issues, which could range from temporary server problems to fundamental misconfigurations in your forwarder setup. Prompt investigation is key.
If you encounter any difficulties or irregularities with your email forwarders, consider these practical troubleshooting tips to diagnose and resolve them:
Serious Warning: Incorrectly configured email forwarders pose a significant risk of leading to lost communications, which can have detrimental effects on personal or business operations. It is paramount to always double-check and meticulously verify all your settings whenever you are experiencing any issues with email delivery or forwarding to prevent such critical losses.
Email aliases, forwarders, and autoresponders in cPanel collectively offer a highly flexible and powerful suite of tools for managing your email communications with remarkable efficiency. Whether your objective is to simplify email administration across various departments, establish automated responses for consistent communication, or consolidate emails from multiple domains into a single point of access, cPanel furnishes all the necessary functionalities. By diligently following the comprehensive steps outlined in this guide, you can confidently create, manage, and leverage these email aliases and forwarders to significantly streamline your communication strategies, enhance organizational flow, and ensure that your email operations run smoothly and effectively.